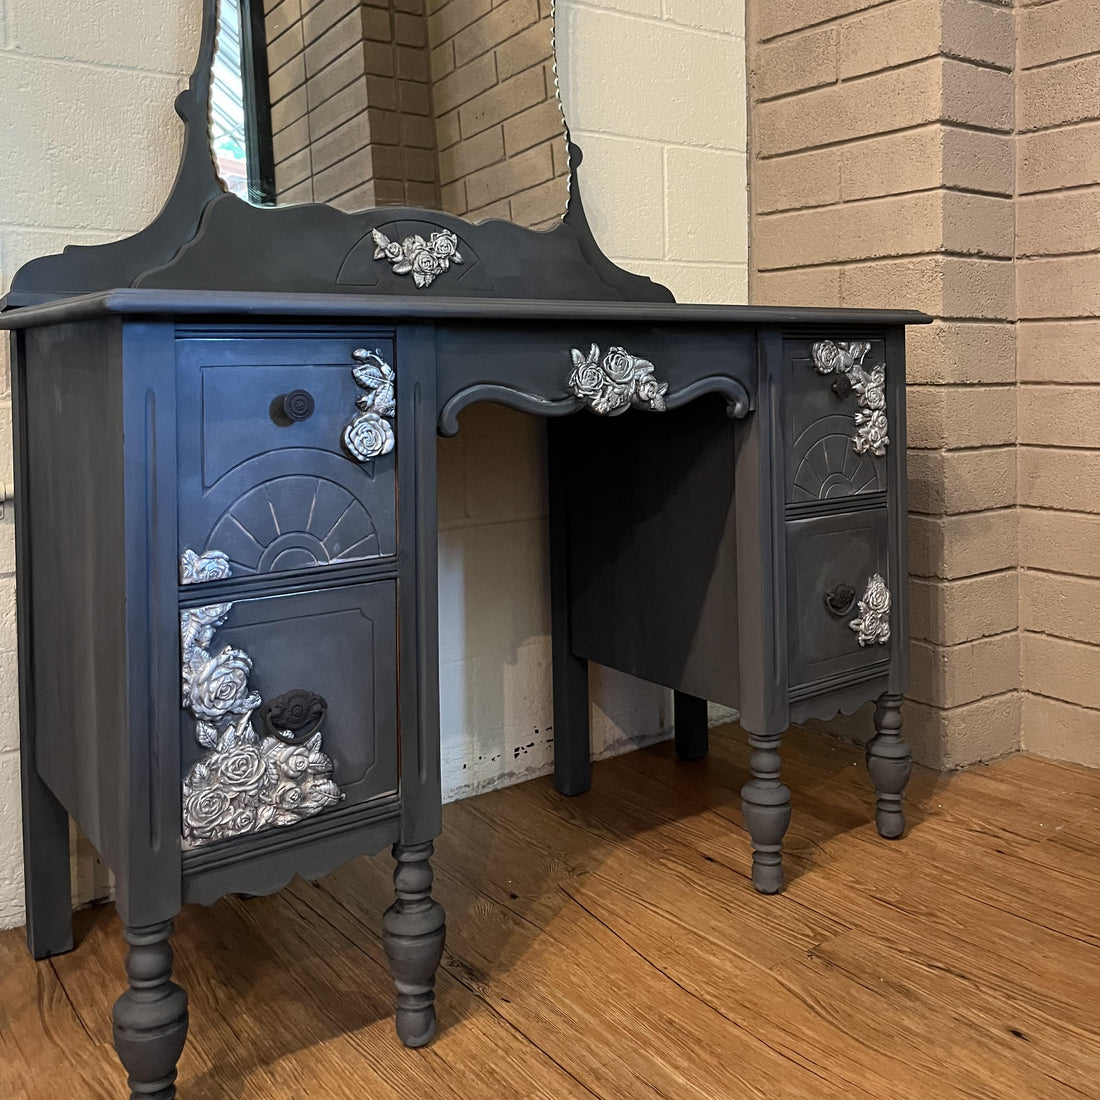
Step 1: Prepping This Dresser

Usually, a bit of repair is necessary on older pieces. Uneven drawers, gouges in the wood, loose hardware, etc. But we lucked out on this little dresser, it had "great bones" and was in very good condition. All Rachel needed to do was clean before she started painting. Dirtex is our go-to cleaner because it's a quick and easy spray and wipe. And, no rinse coat is required so it's a time saver.
Is Prep Always This Easy with Chalk Paint?
Most of the time the prep is only cleaning your piece like we did on this vintage dresser. That's the beauty of using Chalk Paint® by Annie Sloan. The paint is very forgiving and covers scuff marks, stains and a multitude of other things. Every now and then though, you'll have to do a bit more.
There a two things to consider, the prep to repair the piece of furniture and the prep for the paint and finish...
- Fixing the piece of furniture is really up to you...how much time you want to spend to make it comfortable and functional. That's why it's so important to look the furniture over before purchasing. If it's in good solid shape but not perfect, your good to go. Otherwise a little sanding or wood putty can solve a multitude of problems.
- Prepping for the painted finish is usually just the cleaning, as we've said so many times, however, now and then you'll need to go further. When painting kitchen cabinets, a really thorough scrub with a degreaser will ensure Chalk Paint® will adhere nicely to the wood. Our favorite degreaser is Krud Kutter. It's a spray on and wipe off but note you do need a rinse coat so there is no residue left on the furniture.
- Ocasionally, when you are painting a piece of reddish toned furniture such as mahogany, you can get bleedthrough of the wood tannins coming up through your coats of paint. If this happens, it's best to stop painting, wipe on a couple of coats of Zinsser Shellac, let dry, and continue painting. The Shellac will block the tannins and you can get back on track. Zinsser Shellac can be found at most hardware stores. Follow directions on the can.
Step 2: Embellishing with Iron Orchid Designs


Rachel chose the Iron Orchid Designs Juliette Mould to embellish the dresser. These moulds come in so many patterns and styles, it's super easy to transform your project. Rachel pushed Air Dry Clay into the mould and got the rose shapes she wanted. Then she glued the back of the mould and placed on the furniture piece to make her pattern. Air Dry Clay needs about a day to dry, then paint.
What Other DIY Embellishments does Iron Orchid Designs Have?
- Transfer Images that are so EASY to use. The tool to apply the images is included in the package along with easy to follow instructions.
- Paint Inlays - these are the newest of the products and they are applied to wet paint and the image magically appears in your painted surface. Full instructions are included and the patterns are GORGEOUS.
- Stamps and Ink - these are not your mother's stamps.....they can be used on a solid or curved surfaces. The images are so detailed and beautiful plus a wonderful color palette of inks.
All of the IOD products are available at The Owl Box. Shop here IOD.
Step 3: Painting The Vintage Dresser
Rachel used Chalk Paint® by Annie Sloan to paint the dresser. She layered colors and waxes to achieve this finish. Here how....
- One coat of Coco on the Juliette rose moulds
- One coat of Whistler Grey over the entire vanity
- A mix of Annie Sloan Black wax mixed with mineral spirits to make a glaze was applied over the entire piece
- One coat of Annie Sloan White wax (remove excess wax) to accentuate the details and moulding on the vanity
- Applied Annie Sloan Bright Silver Gilding wax lightly on the moulds
- Lots of brushing and blending for the final look
Chalk Paint® by Annie Sloan is available at The Owl Box. Shop here Chalk Paint
It's always fun to pick up an old piece of furniture and make it new again. You can achieve any look or style you want with Chalk Paint®. Modern, traditional, country cottage, you name it....your style awaits!!! For more information or questions, don't hesitate to contact us at The Owl Box. You can comment below or get in touch on our social media channels. Thanks for following along with us!
www.facebook.com/theowlbox
www.instagram.com/@theowlbox
Happy Painting! Gail + Rachel

