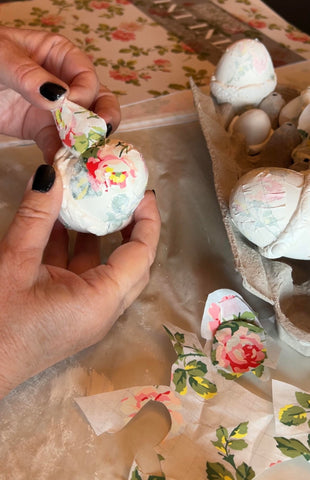
These dainty little eggs are the perfect spring project. We purchased wooden eggs from a craft store, but plastic eggs would also work. It takes several sittings with this project because you will need drying time between stages so plan a little extra time. Here's how we did it. Start by gathering your supplies...here's what you'll need!
Annie Sloan Paint - any white would work but we used Original
Annie Sloan Clear Wax
Annie Sloan Gilding Wax in Warm Gold
IOD Mould Trimmings 1
IOD Air Dry Clay
IOD Paint Inlay Rose Chintz
TiteBond Glue
Mist Spray Bottle
Assorted Brushes

Get a first coat of paint on all the eggs and let dry. TIP: ChalkPaint is fast drying. You will only need to wait 20 minutes to about an hour depending on how thickly you paint it on.
Use the moulds and air dry clay to make the trimming you want. TIPS: Powder the mould with flour or cornstarch before pushing clay into place. Once mould is formed, gently drop clay out using gravity to help .Place the moulded trimming around the eggs before clay has a chance to set. Dry overnight.

Cut up small pieces of the IOD Rose Chintz pattern that you will place on the eggs once you've applied another semi-thick coat of paint.

Gently push your cut up pieces of the Rose Chintz, pattern down with ink pressing into the wet paint. You can mist with water at this point to get the inlay damp and make sure it is pressed into the wet paint. Let dry overnight. TIP: Try not to move the pattern around when pushing it into the paint or it will be blurry.

When the inlay has dried overnight, mist with water and start to pull off the inlay sheet. The pattern will be tranferred onto the painted surface. After a bit of dry time, about 2 hours, we sealed our project with clear wax and gilded the trim.


We LOVED this project. Give them a try and let us know how they turned out! You can get Annie Sloan and IOD products here on our site here


